Caterpillar Burger

We rarely have hotdogs and we had some leftover from the weekend. I decided to cook a hotdog for my lunch. I didn’t have any hotdog buns though. I had only hamburger buns. I wasn’t in the mood to use loaf bread for my hotdog bun and I almost decided not to cook one…
Then I remembered how we used to have quite a bit of fun making hotdog-burgers when I was a little girl. It was such a fun idea and the memories of those days of yore brought a smile to my heart.

*I changed the name of my hotdog-burger to ‘Caterpillar Burger’. Back in 2012, my blogging buddy Tina suggested it and that’s what I’ve called it ever since. Thanks Tina! 🙂

Here’s a set of pictures I took, as I fixed the hotdog,
to share with you, in case you may want to do this too.Down the length of the hotdog, carefully
cut slits a bit more than halfway through.
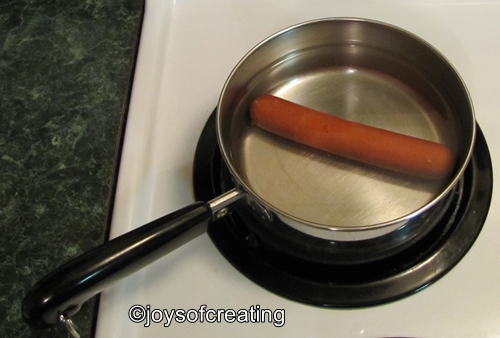
Place the hotdog in a pan of water
on the stove at med high heat.
Heat water to a full rolling boil.Allow it to boil for a few minutes until
the hotdog bends as far as it seems it will.
Carefully remove hotdog from pan of water
and allow to drain on a paper towel or cloth. If need be, Carefully, bend the hotdog into a circle.
Place hotdog on a hamburger bun. You can enjoy it like this or go to the next step.
Place a slice of cheese on top of the hotdog. You can enjoy it like this or go to the next step.
Place bun on a microwavable safe dish,
microwave for a few seconds until the
cheese is just melted over the hotdog. Allow the hotdog to set until
it’s cool enough to safely eat.

Add chili, mustard or ketchup or
your favorite relish and enjoy.

Tah-dah! And there you have it folks a ‘Caterpillar Burger’.

Happy Creative Cooking!

*I don’t know if microwaved hotdogs will cook and bend in a circle, I’ve never tried them.


.


Farm Kids Quilt (2)

q00
0rangespacer2

Repost from –> August 31, 2011 (edited)
My Farm-Kids Quilt is finished
How I quilt a quilt on my regular sewing machine

August 31, 2011 –> I finished my farm-boy & sunbonnet sue quilt today. I’m pleased as peaches with it. Especially since it was the first queen size quilt I ever made. Originally I made the quilt top full-size to fit our bed. I decided to change it to a queen-size because someday we’re going to need a new bed and I figure we’ll buy a queen-size instead of getting another full-size. Because of the extra-added size, I ran into a few issues, but I managed to work them out okay.

I want to share the method I used to quilt it. I’m lousy at taking quilt photos because I can’t get a really good angle, but hopefully, you all can figure out the gist of what I did.

q1
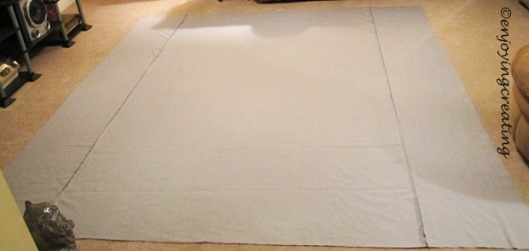
1) Lay backing on the floor wrong-side up

q2
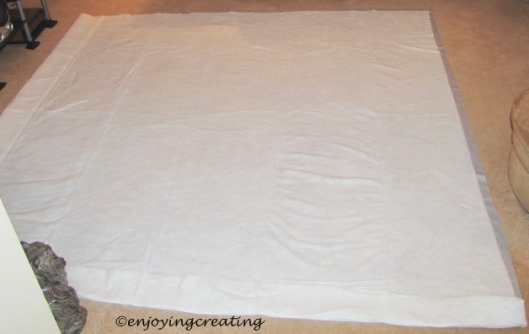
2) Lay batting on top of backing

q3
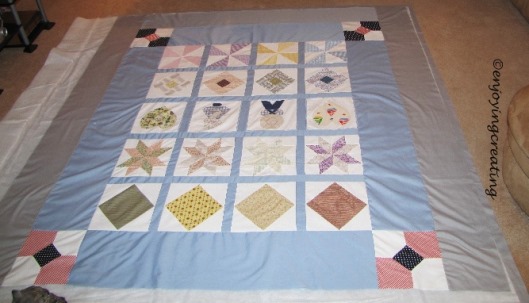
3) Lay quilt top right-side up on top of batting.

q4
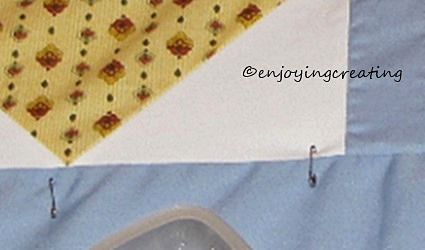
4) Starting from the outer edge, Use safety-pins to join the top, batting & backing together.
Put safety-pins every so many inches all across the quilt.
q4a
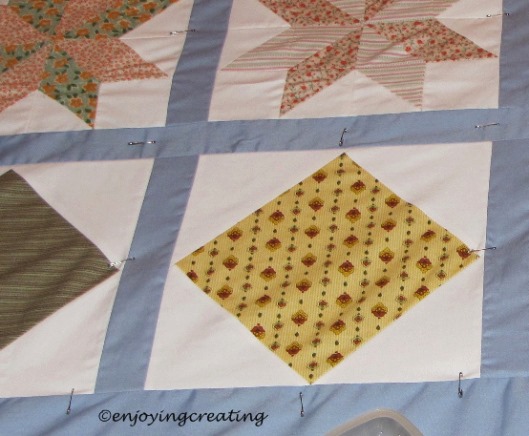
I roll the quilt up as I go because it makes it easier to handle.
q5

q6
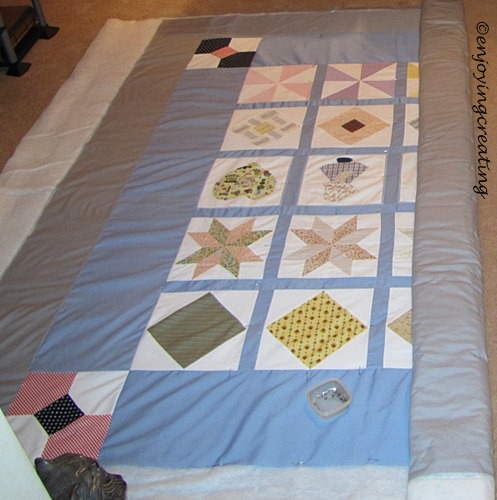
5) After it’s pinned all the way across,
unroll quilt and spread it out flat.

q7
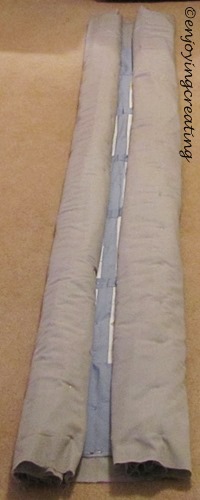
6) Starting at outer edge, roll each side to the middle

q87) Carefully slide the quilt under the pressure foot.

q9
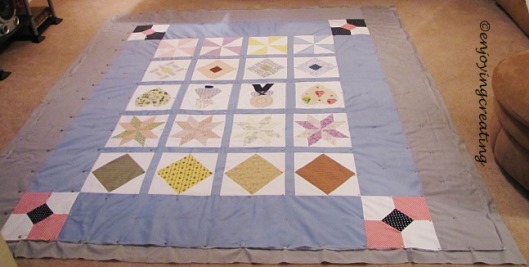
8) Starting in the middle, Sew in the seam (ditch) or near the seam.
Be careful and remove the safety pins as you go and don’t sew over them.
Unroll the quilt as you go.

After you finish the first half, flip the unrolled half around and place the quilt back under the pressure foot and continue until you reach the outer edge.
*The main idea is to start at the center of the quilt and work your way to the outer edges.

q10
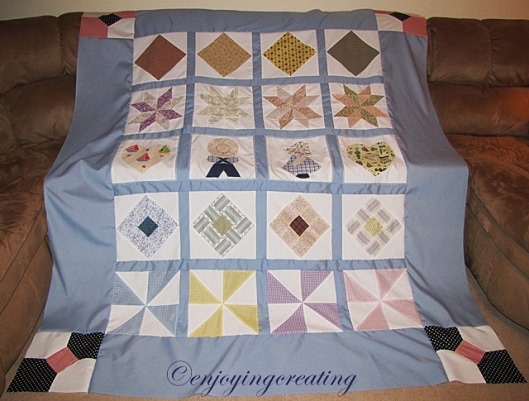
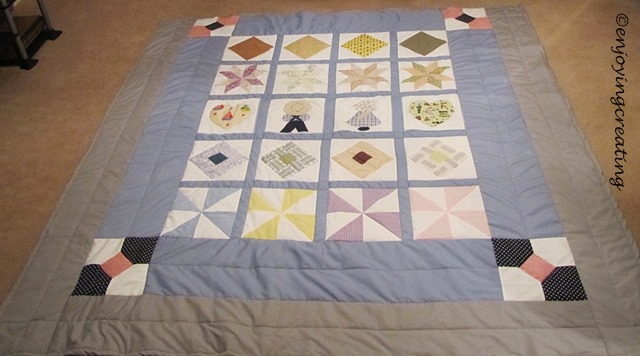
9) Here’s the finish quilted quilt
It’s 90″x93″ inches

q11
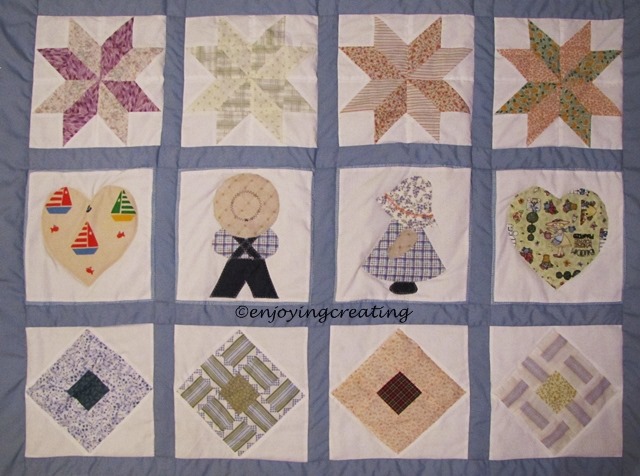
10) Above photo is the middle after it’s quilted.

q1211) Here’s what the back of the finished quilt looks like

q13
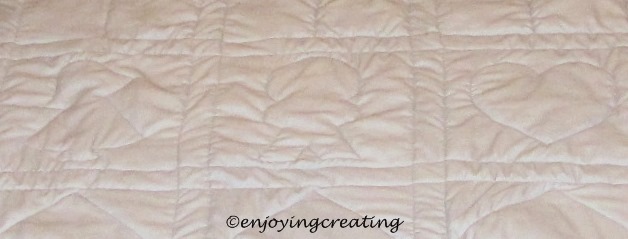
12) Here’s a close up of the back of the finished quilt.

All-in-all I think it turned out quite well.
It’s soft and snugly and will be warm this winter.

0rangespacer2

Today, January 24, 2015

q00After I finished the quilt I didn’t like the squared corners, so I rounded them off.
Also, originally, when I made this quilt we didn’t have a queen size bed. I guessed at the dimensions.
We got a queen size bed this past fall and I was surprised delighted to see my quilt fit perfectly.

Wishing you all happy crafting.
t6001
spgrnbgln

Farm Kids Quilt (1)

frmkds1

Repost from –> July 11, 2011 (edited)
Weekly Photo Challenge: Old Fashioned

The topic for July 11, 2011 week’s photo challenge hit right in sync with what I’ve been up to lately. I get nostalgic from time-to-time and try to find or make something from the past to reconnect with my memories. Gardening season is particularly nostalgic for me because my parents planted a big garden every year. My Mom loved it and spent as much time as possible tending it and harvesting the scrumptious veggies. I’m thankful I live where I can have a garden because gardening makes a special connection of so many treasured memories for me.

This year along with my thoughts of Mom’s joy of gardening came the memories of her joys of sewing and quilting. These thoughts put me into the quilt making mood. I wanted to make one like a sampler quilt of the ‘old fashioned’ designs that were Mom’s and my favorites.  Mom made many beautiful quilts. In the early years all her quilts were to keep our large family warm and snug at night. In later years after we young’uns were grown and in our own homes, she’d make quilts and donate most of them to charities, but a few she gave to family. I have a couple that she made me and I truly treasure them.

I’m having to make the patterns from scratch and it’s not been an easy thing to do. I look online for the closest design and then I take paper, pencil and ruler and make them like I remember Mom’s to have been. I’ve a great admiration for my Mom and the way she would whip through making a pattern by grabbing a piece of paper and scissors and just cut it out freehand with no measuring. After she finished a quilt top, she would either quilt it on her sewing machine or do the tacking method. Mom was a talented seamstress and could sew up most any design of quilt or clothing or anything else without a store bought pattern. She was truly an artist with fabric.

When I started making my quilt blocks I wanted a couple of them to be farm kids. My Mom had a farm-boy quilt top that she made when she was a teenager. She also had an incomplete unfinished farm-girl quilt top. I always loved the quilt tops and wish she had of finished them into full quilts. Every so often, she would take the farm-boy quilt top and lay it out on the bed and speak about it in such loving nostalgic tones. It was just wonderful. Mom hand sewed each applique into place. It must have taken her months of dedicated work to get them all together. I recall that some of the fabric pieces had their own story of where she got them. I wish I could recall everything she’d said about it. The farm-boy squares were pieced together with red fabric borders (that’s the color I remember it to be.) It was such a fun and cheerful quilt top.

I don’t know where Mom’s quilt tops are now and I didn’t have them to go by. I had to create the farm-boy from memory. I couldn’t find anything online that resembled him. There’s a Sunbonnet-Sam but he isn’t like Mom’s farm-boy. It took me a few days, but I finally managed to design what I think is a close rendition of him. The farm-girl was a bit easier, she’s known as Sunbonnet-Sue. She has many variations. I wish I had better memories of her but Mom didn’t get her quilt top out but just a couple of times. I’m lucky I even recall her at all. I think my farm-kids look okay. I cheated and used the sewing machine to applique them on. I’m too lazy and impatient to hand-sew them on.

Anyway, at this moment I have all my blocks made and will make a post on the quilt top when I get it all sewn together. I think Mom would be proud of my efforts. I remember how much she enjoyed when I made quilts for my son and grandson. I sure wish I had her talents for the ease of design and making the quilts. Mom was truly a wonderful homemaker: sewing, cooking, canning, gardening, yardening and so many other things.

Do you ever get in nostalgic moods and try to find or recreate a something from scattered bits of memory? How did it go? Are you like me and fairly satisfied with the results of your efforts?

Wishing you all good old fashioned down-home fun times of making memories and carrying on traditions.

0rangespacer2

July 25, 2011

I’m happy to report that
I found time today to finish my quilt top.
I think it turned out pretty well.
quilt-2011
My husband looked at it and told me, “That’s pretty. I feel warmer already.” lol
I hope I get it quilted before winter so we both can feel it’s warmth. :p

0rangespacer2

Today, January 23, 2015
Check back soon for the last post of the
quilting and finishing of my Farm Kids Quilt.

Wishing you all a happy weekend.
cloudhug
spgrnbgln

Internet issues update – quilt post plans

pcstuph0Our internet & phone issues worsened over the past few days.
Today we had the tech-guy visit and fix everything (hopefully).
He even sped our internet up a bit.
Hopefully, we’re ready for smooth surfing ahead.
compu~*~

IMG_8623There’s been some interest in the quilt in the photo with Sheli & my s-loom. I’m going to make 3 posts about the quilt. The posts will be re-post from my ex-blog enjoyingcreating. Some of the content will be updated or edited as needed.

The first post will be about my method of coffee dying one of the appliques.
The second will be the story behind the quilt.
The third one will be the quilting of the quilt on my sewing machine.

I’ll start posting my quilt posts soon… Unless my internet goes down or offline life needs my undivided attention…

sewmiconHave a dandy of the rest of the week!

graphics-rainbow-260262
spgrnbgln

Using a Mason Jar with a blender For a Single Smoothie


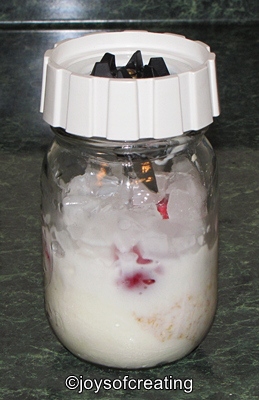
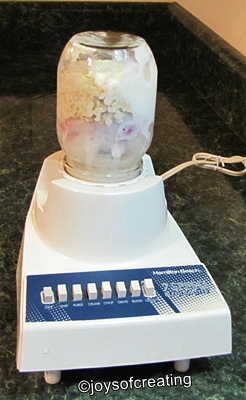
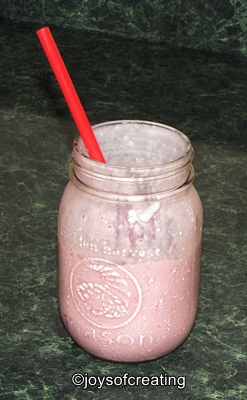
My sister has one of those handy dandy single smoothie blender thingies. Like a good little sister still following in her big sister’s footsteps, I wanted one too. I use my blender for smoothies. It’s a bit off-putting to have to wash the many parts for one little old smoothie. So, as I said, I wanted a single smoothie maker.

I went shopping around the internet and was quite dismayed by the prices of the better rated single smoothie makers. I was sad and thought that I’d just stick with my blender… ~sigh of dismay~ and then my little old gears began to turn in my mind and brought forth a memory…

Back in 2001, after a stroke, my Mom couldn’t eat solid foods anymore. My Brother was her primary caretaker and he figured out a way to puree several different foods and keep them on hand without having to clean a complete blender every time: he used mason jars instead of the blender’s pitcher container.
It’s such a clever idea, I asked him how he thought of it.
He told me that back in his younger days, he and his friends made daiquiris in mason jars.
I think it was wonderful he remembered it. I believe that God teaches us things to use later on in life, even when we’re not aware of it. I think the lesson of the mason jar and blender was meant to help during the time of his caring for our Mother.
Mom was certainly grateful for his knowledge and tender care in helping her to try and get better. I wish Mom was still with us. I think she would enjoy the smoothie craze. She loved making milkshakes for us young’uns and our Dad. Mom loved making new recipes, especially dessert type foods.

.

After remembering about the mason jar and blender idea, I got a pint mason jar,  put some ingredients in it and happily made a single smoothie.
Goodness it was tasty and clean up was so much easier.

Unfortunately, not all blenders are mason jar friendly. However, if your blender is one that can be used with a mason jar and if you decide to use this idea, some of my following suggestion might be helpful:
-follow blender manufacturers recommendation about ice or frozen ingredients.
-fill the jar only about 3/4 or less of-the-way full,
-make sure the blender collar fits the neck of the jar securely

-use quick ‘pulses’ until you’ve chopped up the crushed ice or/and frozen fruit and/or large chunks of foods. After it’s fairly well chopped up, blend it normally.
-now and then you may need to take the jar off the blender base, leave the blender collar/blades on the jar, shake the food down and then put the jar back on the base to blend some more.
-you can pour your smoothie in a glass or do like I do and drink it from the jar.

I’m glad I remembered the mason jar/blender idea. I use it for more than smoothies. It’s easy to chop nuts, bread crumbs, crackers or other things, put a ring/lid on the jar and save them for later.

Do you have a favorite blender recipe or helpful hint?
Wishing you a smooth rest of the week.

.