Back in 2011, I made two quilts. On the the first quilt I made, I ran into a problem of finding the right print fabric and I had to improvise. I coffee-dyed a piece of fabric and then cut my heart applique out of it and used it in the quilt.
I posted about it on my ex-blog Enjoying Creating. There was a discussion as to if the coffee dyed applique would hold it’s color in the years to come…
Well, over the years, I’ve washed my quilt 4 or 5 times. And the coffee-dyed heart is still holding it’s color.
This may not work on some fabrics that’s washed every week or month, but it worked-for-me on my heart applique.
Since it’s been a few years, I’m making this post mostly a repost of of my 2011 tutorial blog post (from my ex-blog) to share my method of ‘How I Coffee Dye Fabric’
——————————
‘How I Coffee Dye Fabric’
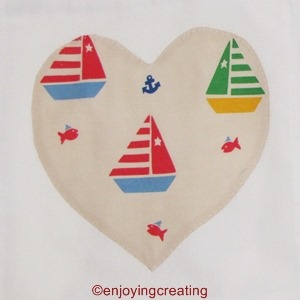
I couldn’t find the right fabric for a heart applique for a quilt block, (well, that’s a lie, I did find the fabric online, but I refuse to pay between 9 to 12 dollars for a half yard of fabric + shipping/handling)
I went through my fabric and found some that’s pretty close to what I wanted. The main-color is way too white and clashed dreadfully with the white background of my quilt blocks. It took me a few minutes to think of coffee dying the fabric. I looked up directions and was pleased to discover that it’s not too terribly complicated.
I adapted and adjusted some of the steps and am really happy with the way the block turned out.
Have you ever used coffee or tea to dye fabric? Did it do well? Did the the color hold up fairly well over time?
If you try my method of dying fabric with coffee, let me know how it does for you.
🙂
————
How I Coffee Dye Fabric

1) Make coffee like
you normally would

2) Place fabric in a glass dish
Pour coffee over fabric
Allow it to set for 30 minutes

3) Remove fabric from dish
wring out excess coffee
allow to dry
I put paper towels on top of my fabric square
& paper towels underneath it & ironed it dry
If a darker color is wanted repeat step 2 & 3
I repeated this twice for mine.

4) I used vinegar to set the color.
I put just enough vinegar on the square to
cover it and then let it set for 30 minutes.
Afterwards, I ironed it dry like in step 3
5) Wash the fabric with dish-washing detergent
rinse & let it dry or iron it dry again

Here’s the finished dye job
I cut a heart shape out &
appliqued it on my quilt block

Here’s a comparison to
the original fabric and the newly
coffee dyed applique heart.
I’m real pleased with it.
🙂
—————————
*Here’s some Hopefully helpful hints*
~~~
If you’re going to use vinegar to set the color, ‘DO NOT’ use an aluminum pan.
The first square I made, I tried using an aluminum pan and it was terrible.
The vinegar reacted with the aluminum and turned it a nasty splotchy dark color.
Here it is, on the left side of photo, next to a successful square to show the difference.

~~~
I froze the leftover coffee in a bowl and added the left over coffee in the pot each morning for a few days to it. Now I have a handy supply of coffee on hand, if and when I take a hankering to coffee dye fabric again.

~~~
Happy Crafting!


 I haven’t excelled at being productive on loom knitting my new blanket. I’ve worked on it a few hours, so far. After this update, I’ve decided to give updates on my blanket only when I’ve made significant progress, so it may be one a month or none-a-month…
 I’ve been working on a plastic canvas project for my Grandson. He enjoyed the minecraft blocks that
  I bought a couple new lamps the other day. The main selling feature to me was the swing arm. So, far it’s worked out great. The swing arm helps when I’m reading and crafting.
 In sadder news, Sunday 1-11-2015, Rex the triop (tadpole shrimp) lived to the ripe old age of 21 days and then curled up his 80 toes and died. I’m not sure what went wrong with the little feller.
 Shelibean will miss Rex too. While I tended to Rex each day Sheli would enjoy napping on our spare bed. It was short naps, but enjoy them, he did.
 There’s not much going around here lately, except for cold weather. Brrr. We got a dusting of dry snow on 1-7-2015. Over the course of the next few days, the temps got down to as love as 3° during the night. Fortunately, our pipes didn’t freeze.