


 Here’s a few things that I’ve found to be helpful.
![]()
 In my opinion, most zippers are a bit pricey. I don’t mind so much if I’m buying a specific zipper to match fabric to make a piece of clothing, special projects or home decor type stuff, however, there’s some craft projects that need a zipper and I’d rather not sink a lot of money in them. After thinking about the problem awhile, I figured out an inexpensive way to buy zippers . I buy the really cheap zipper bags and take the zippers out of them. When I want to use the zippers, I can cut them to whatever length I need. The bags in the photo were a dollar each. The smaller one has 2 in it, so I got two 16 inch zippers for a dollar. The other 2 bags are of really long and extra long lengths, I don’t know their exact lengths, I haven’t disassembled the bags yet to measure them. These zippers probably won’t last in a heavy duty project like jeans or sleeping bags… and then again I could be wrong and they might hold up well. This is a relatively new idea of mine and I haven’t used them yet. But even so, I think it’s a good idea anyway. (as for the plastic part of the bags, I fold it neatly and store it away because I hope to find some uses for it too someday)
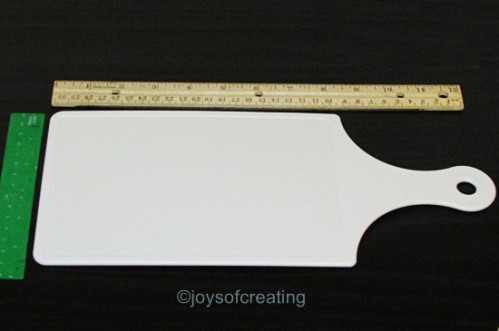 Here’s an idea for an inexpensive and small heavy duty hand-fan (duel duty if you want). It’s a small cutting board. lol I discovered what a great fan it made, when a hot-flash hit and it was the smallest lightest weight thing in my reach that I could use to wave in the air and help cool me off. lol Seriously, though, you can’t tell it from the photo, but it’s not very big. The handle is a nice advantage; it’s light weight enough to tote around the house or take outside or most anywhere.
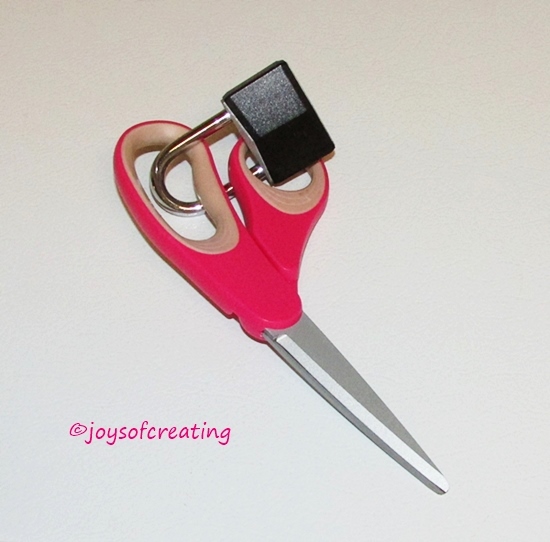
 I bought these ‘Incredible Hooks’ at a dollar store. You may have seen commercials for hooks like them. You may have wondered if they’re as easy to use and handy as the commercials say. I’m here to tell you that they most definitely work for me in drywall (Sheetrock). I love the ease of putting them where I want and removing them if I want too. I was truly surprised these work. These are great. There’s 20 in the pack and I haven’t needed to buy anymore, but I won’t hesitate to buy more if/when I run out.
 I usually have several projects going at the same time. I find it’s handy to keep them in 2 gallon Ziploc bags with their supplies. This makes them easy to pick up and take with me to work on them most anywhere. I use much bigger plastic bags for my crochet blanket projects. Keeping the projects in plastic bags helps keep them cleaner too.
I hope one of these ideas may be helpful to you or may spark an idea for you to build on.

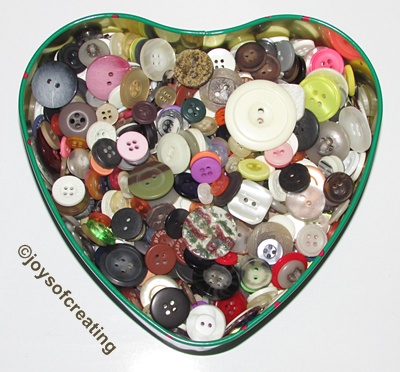 When I was growing up, I was taught to save buttons off old clothes just in case I might need them later on. Indeed over the years, old buttons has saved me money and time.
 Well, this weekend, I learned something new and I’m going to share it with you… Awhile back, the slider part of the zipper in a pair of shorts broke. I had to order a pack of zipper sliders. I thought they were over-priced, but they’re still cheaper than buying new shorts. After I put the slider on the zipper and had the shorts ready to wear, it suddenly occurred to me that I should save the sliders off old pants or clothes that we’re going to throw away. If I had been saving sliders over the years, I may not have had to buy any. Cool, I learned something to help me in the future. (If I can remember it and it doesn’t slide out of my memory. lol 😉 )
 We got some more of our garden planted this weekend. I still have a few squash & cucumber seedlings to plant in the garden, but they’re not old enough yet. They need to put on some true leaves and grow a bit more.
Most folks plant squash and cucumber seeds directly in the garden and the seeds do great. Our garden is real contrary and doesn’t start squash and cucumber seeds well at all. I wish it did because it would make less work for me. Thankfully, after the seedlings are planted in the garden soil they’re usually productive.
 We sure have enjoyed sitting on the porch these warm (windy) days. It’s so comforting watching the world turn luscious hues of green. I hope everyone had a good weekend. Here in our area, it was really nice. The temps got up into the high 80’s and the forecast looks good for the next few days.

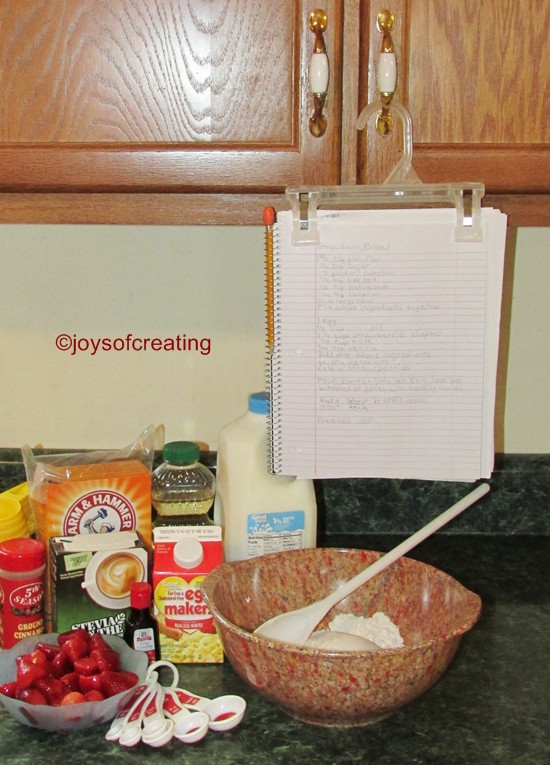 Yesterday I gathered ingredients together to make a loaf of strawberry bread. I set my recipe & stuff up like I always do and then it occurred to me that I wanted to make a post about a few of my favorite hints for re-using/recycling clippy hangers or pant hangers.
These are not my ideas and they’re not new ideas. You may have seen them or read of them before. I still want to share them since they’ve been a help to me.
I’m very grateful to clever folks who shared these hanger ideas on the web. I surfed around and tried to find the earliest posting of these hints on the web. I posted the links and dates with the hints. (If you know of an older posting, let me know and I’ll edit it in.)
Now without further ado, here’s a few clippy hanger hints.
~*~
Use the clippy hanger as a recipe book holder. Just clip it on the book and hang it from your cabinet door.
It keeps the book off the counter and helps to allow more counter space to use for making foods.
I really enjoy this hint. I use it alot.
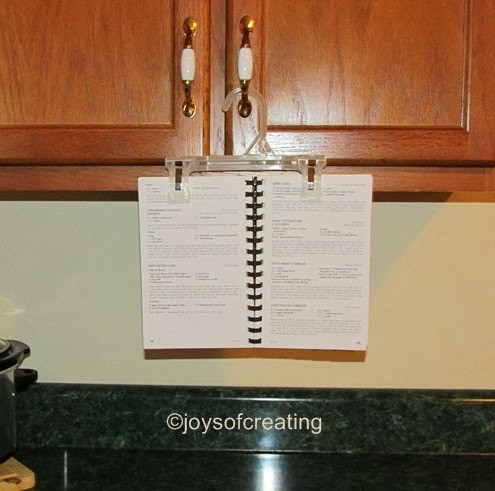 The hanger cookbook holder – February 06,2009
~*~
Cut the clips off the hangers and use them for bag clips or like clothes pins, paper clips, chip clips or clips to help hold things together in crafts, such.
I tried and failed miserably to cut the clips off with huge industrial scissors and with a wire cutter. My compliments to whoever designed the hangers, they are super sturdy and hard as the heck to cut. I didn’t have a saw, so I used my craft drill to cut the clips off with it.
I really like having these inexpensive clips, they’re super handy to clasp on to a bag or hold a craft together or papers together. There’s so many uses for them.
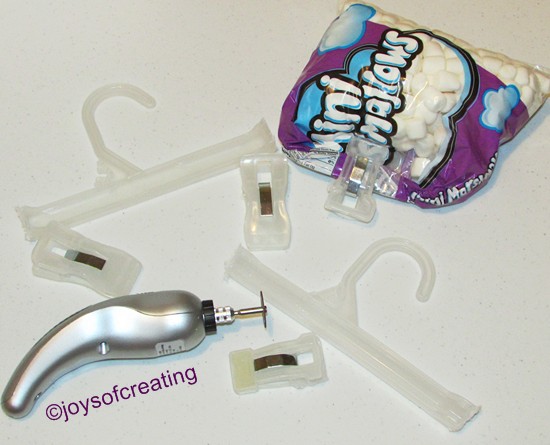 Unexpected chip clip – August 19, 2009
~*~
Cutting the clips off the hanger came from a forum and as I read further down the thread, someone suggested putting magnets on the back of the clips for refrigerator clips. There was mention of how to decorate them, but I chose to wing-it and do it my own way.
 I got out my flower loom and made a flower. I intended on having one simple flower on the clip… well seeings how it’s the unwritten duty of a crafter to over embellish, whenever the opportunity is there, and I take my crafter duties seriously, I made a couple more flowers and crocheted 4 leaves. I’d of added more, but I ran out of room on the clip. lol It’s quite cheerful looking and I’m
 surprised happy with the gawdy fun results. (I may decorate my recipe book hanger too. )
 Refrigerator clips – August 19, 2009
~*~
I think those hints are clever ways to recycle and reuse clippy hangers. I used the leftover part of the hangers to hang up a couple plastic bags of craft supplies in the closet. Storage space is dear in my craft room and I’m always happy to figure out new ways to hoard store supplies.
I’m fortunate to have dozens several of these hangers on hand from buying clothes for my grandson over the years.
I’ve given several away while passing on the hanging recipe book hint. My grandson really got a kick out of that idea and even took a couple hangers home to his Mom to show and give to her. I love that he enjoys sharing fun helpful ideas. He’s such a sweetie.
Next time you have some extra clippy hangers laying around, I hope you’ll consider giving one of these hints a try.
Do you know any helpful for re-using or recycling hangers? You’re welcome to share them, if you want.
Here’s hoping that you’ll have an enjoyable rest of the week hanging out waiting for warm weather.
🙂

 My above photo is some of my left over yarn wrapped around clothespins. I did this to show that I think it’s a neat idea. This idea could be used for embroidery thread, yarn, ribbon, twine or most anything stringy to help keep them neat and tidy.
I searched and tried to find the original poster for this idea. Unfortunately that website is gone now, so here’s a link to the next to the oldest one I found: factorydirectcraft
 My favorite stitch in loom knitting is the e-stitch or e-wrap stitch. It’s makes a rib type pattern and I like the look of the finished project.
The e-stitch is simple since it’s just wrapping the yarn around a peg. It can be used for cast on as well.
However, the most irritating and frustrating thing about using this simple stitch is if you let it loose for a nano second while wrapping the pegs , the yarn will spring to life and unravel like a joyous snake of rebellion.
I resolved the unraveling issue, sort of. After I wrap several pegs, I put a clothes pin on the yarn sort of between a couple of the wrapped pegs and then continue on wrapping. I move the clothes pin along as I get further around my loom.
If you use this method you may notice that the clothes pin overlaps the pegs on some looms.

This next tip comes from an idea sparked by my Bff. I complained about when I was looming, if I had to leave my loom to do something else like housework, when I’d come back to looming, I couldn’t remember if I was going left or right. I ripped out more than one project because of this memory lapse.
My Bff shared with me that she had resolved this issue by using a pencil gripper to set down on a peg a dozen or so ahead of the way she was going. That way whenever she sat down to loom again she knew which direction she was headed.
I didn’t have any pencil grips, but I did have other things that would work just as well.
*Use something that can’t be knocked off the loom peg: stitch marker, clothespin, safety-pin or a pencil gripper
Place it on a peg several pegs in front of the direction you are going in, move the clothes pin along as you go further around your loom.
If you use this method you may notice that the clothes pin overlaps the pegs on some looms.

These are things that work for me, they may not be right for you, but I wanted to share them anyway.
I hope some of the tips maybe helpful in making your crafting adventures more enjoyable.
Wishing you all a sunshine filled week.
🙂
