I’m happy to tell you that I’ve finished making my hat. It turned out quite well, even though I made the pattern myself. Unfortunately, the hat is way too small for my head. I realized before I added the lining that it’s way too small. It’s definitely kid sized. I totally underestimated how big my head is. 😀
My husband suggested that I should have stopped this one and tossed it and started a different bigger one.
I told him that, I would have, but I’d have to make a bigger pattern and also, I was determined to finish this one, since I promised I’d post about it here on my blog, regardless of how it turned out. Other than being way too small, my only other issue with it, is the inside lining isn’t as neat as I’d like it to be. I may or may not make another hat. I’d like too. I enjoyed making this one very much. However, if I do, I might go ahead and order a pattern instead of making a pattern, or not, I never know about me, until the inspiration hits. 😊
Wishing you all a weekend of sunshine and smiles.
🌞😎
I thought I’d give a try at making a hat by making my own pattern. I could have ordered a pattern, but that would be too convenient. 😊
The basic idea of how to make a pattern has been on my mind for a while now. Since I’m not working on nor planning a big project at the moment, I thought it was a good time to try my hat idea. I’ve got the hat-makings cut out and ready to sew together. After I get it made, I’ll post its final outcome good or bad. 🧵🪡
Wishing you all a beautiful sunshine filled rest of the week!
I made some ‘Non-Edible Homemade Scented Bakeable Clay’ to make a table-setting. It was fun sculpting the pumpkins, acorns and pie. I used cookie cutters for the leaves, hearts & stars. It came together nicely. I use battery operated candles in it just to give it some character.
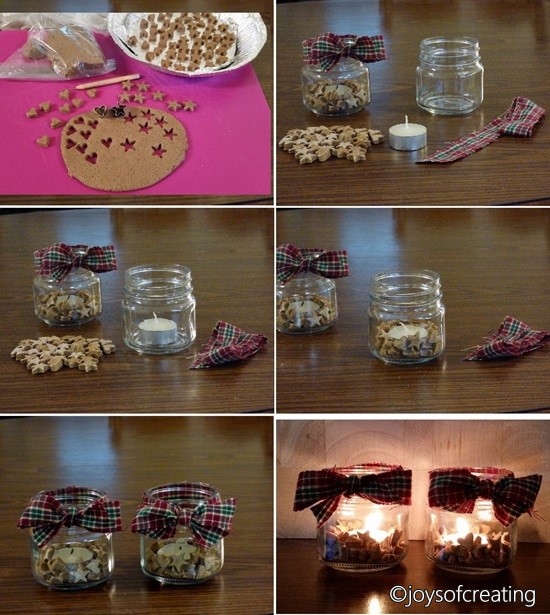
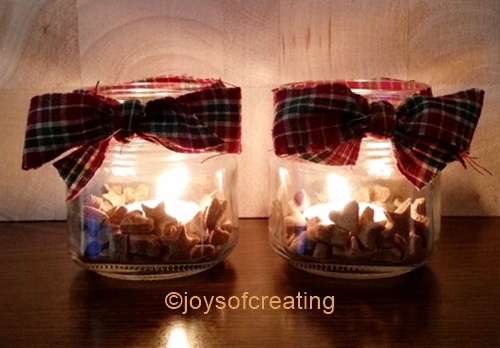
I made several tiny cookie cut outs of hearts and stars. I put them in a 1/2 pint canning jar with a tea light and made sort of rustic looking candles. For this craft, I used an actual wax tea light candle.Then I thought I should make gingerbread type ornaments just out of tradition. I didn’t do too good of a job on their faces, but they serve the purpose and used up the last of my dough.
I made a short video showing the pieces I made setting together.
A few of my thoughts on making
‘Non-Edible Homemade Scented Bakeable Clay’
One of the most attractive aspects of bakeable homemade clay is that it’s a lot less expensive than commercial clays. I can ‘try to make’ bigger projects and if they don’t work out I can toss them without feeling too-bad for wasting money on clay.
One of the disadvantages to This bakeable homemade clay is that it ‘IS NOT WaterProof nor Moisture Resistant’. It Will Disintegrate if exposed to too much moisture or liquids.
You can paint and/or seal the sculpts with a finsh to help protect them some.
I’ve not painted nor sealed my sculpts, I like smelling them. I think sealing the sculpts with a finish or paint would block their aroma too much.
With all the salt and spices and considering how hard it is when it’s baked thoroughly, I consider this a ‘Non-Edible’ Homemade Bakeable Clay.
As for cleaning finished baked pieces, I suggest dusting with a feather duster or a soft cloth.
I use a basic bakeable recipe and add spices to it. It really makes my home smell like holiday baking. I used ground cinnamon and ground cloves, (but ginger, nutmeg, pumpkin spice or other spices could be used as well.)
I use ‘all purpose flour’ (it’s also referred to as plain flour). I use it to keep the clay from puffing too much and ruining the shape of my project. It seems a simple thing to say, but if you go in search of recipes for bakeable homemade clay many of the recipes will just call for ‘flour’ and not specify ‘plain’ or ‘all purpose’. It makes a huge difference in the outcome of your project.
I find there is some loss of detail in the baking process, so I try to make the details a bit deeper and more defined to allow for that. I don’t always get it right.
Here’s a link to the basic recipe I used: http://www.ehow.com/how_8536912_make-bakeable-clay.html
I use ‘all purpose’ flour.
To that recipe I added:
3 tablespoons cinnamon
3 tablespoons of cloves.
I kept my dough in the refrigerator between projects. **Because of all the spices and salt,
I consider this recipe a
‘Non-Edible Homemade Scented Bakeable Clay’
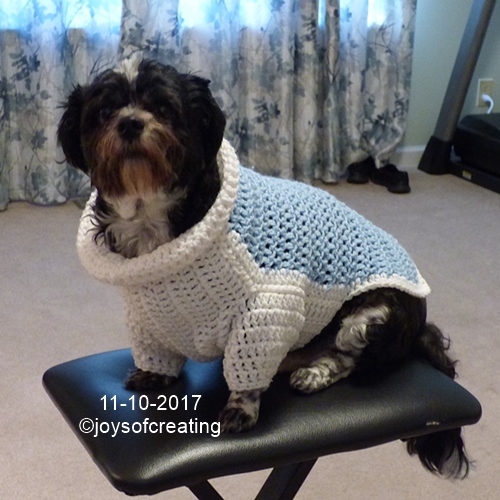
Shelibean is a nudist. He hates wearing store-bought clothes and sweaters. Since we rarely take him outside in the winter-time, it’s not an issue. However, I still want him to have a sweater when we do take him outside. And it’d be a big bonus if he is content in it.
It occured to me that he enjoys my crocheted collars and blankets that I make for him, so maybe, just maybe, he’d might be more content in a sweater I crocheted.
Starting early this morning, I set about crocheting him a sweater. It went together easier than I thought it would. I can’t believe I actually got it finished.I don’t have a pattern, so for the length and the width I kind of went by a store bought sweater. The store bought sweater just has slits where his front legs go, but I decided to put sleeves in it to try and keep him a bit warmer.
I think the sweater turned out pretty good. I think Sheli looks adorable in his new sweater.
He seems to like it quite well.
He strutted around the house in it and acted happy.
Sending out warm thoughts and snuggles to your pets.
Recently I decided we needed a new potato bin for our kitchen. I wanted a small one to set on the counter. I shopped online but couldn’t find one made the way I wanted. I talked it over with my husband and he suggested we build our own potato bin. Together we designed the new potato bin. We gathered the supplies over a couple weeks, but it took my husband only a few hours to make the bin. I’m pleased with our new potato bin. It looks a lot better in reality than in the photo, it has a rustic charm sitting on our counter.
Wishing you all a successful week.
Edited in:
*My potato bin is large enough to hold 10 pounds of potatoes.
*My husband didn’t use any stain on the wood inside the bin. We worried that the potatoes might pick up chemicals from the stain. I wiped the inside of the bin out with bleach water to hopefully deter any molds or mildew on the wood and then I let it air out over night.
*I added an open top plastic box as a drawer to keep the potatoes off of the wood. My main reason for this is that potatoes don’t all age at the same speed and sometimes one may go bad and ooze a stench of nastiness. I can’t imagine ever being fully successful at cleaning the stench out of the wood.

 I’m happy to tell you that I’ve finished making my hat. It turned out quite well, even though I made the pattern myself.
 Unfortunately, the hat is way too small for my head. I realized before I added the lining that it’s way too small. It’s definitely kid sized. I totally underestimated how big my head is. 😀
 Other than being way too small, my only other issue with it, is the inside lining isn’t as neat as I’d like it to be.
 I may or may not make another hat. I’d like too. I enjoyed making this one very much. However, if I do, I might go ahead and order a pattern instead of making a pattern, or not, I never know about me, until the inspiration hits. 😊
 I thought I’d give a try at making a hat by making my own pattern. I could have ordered a pattern, but that would be too convenient. 😊
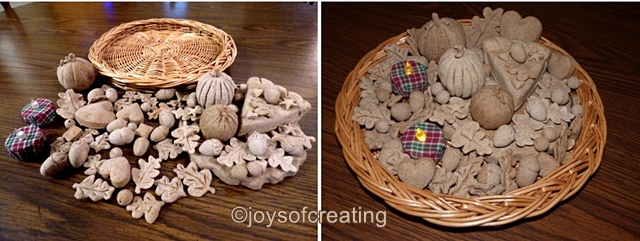

 Then I thought I should make gingerbread type ornaments just out of tradition. I didn’t do too good of a job on their faces, but they serve the purpose and used up the last of my dough.
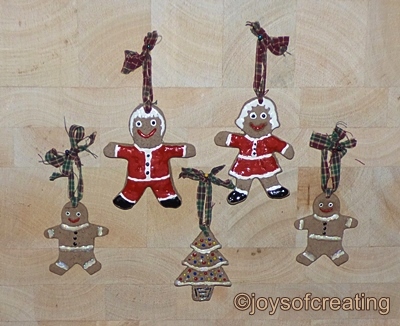

 I don’t have a pattern, so for the length and the width I kind of went by a store bought sweater. The store bought sweater just has slits where his front legs go, but I decided to put sleeves in it to try and keep him a bit warmer.
 I think Sheli looks adorable in his new sweater.
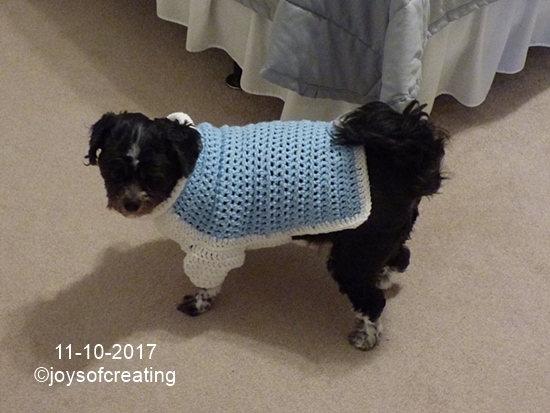
 Recently I decided we needed a new potato bin for our kitchen. I wanted a small one to set on the counter. I shopped online but couldn’t find one made the way I wanted. I talked it over with my husband and he suggested we build our own potato bin. Together we designed the new potato bin. We gathered the supplies over a couple weeks, but it took my husband only a few hours to make the bin. I’m pleased with our new potato bin. It looks a lot better in reality than in the photo, it has a rustic charm sitting on our counter.
