Crochet Cast On Loom Knitting

Here’s my video tutorial of sorts of the method
I use to ‘crochet cast on’ on a knitting loom.
Hopefully it’ll help to show others how to
‘Crochet Cast On’ on a knitting loom.

It’s my first tutorial video for loom knitting,
so if I need to add or change anything,
leave me a comment and let me know.

Happy Crafting!


Loom knit and Needle Knit Dishcloths

I was a teenager when I last knitted with needles. I made baby hats and booties that I sold in a thrift store. I liked knitting and wished I could have expanded my skill past a knit stitch. Knitting with needles took alot of coordination and talent to make really pretty stitch patterns and in my teen years I just wasn’t able to master it.
I took up crochet in the years that followed. Crochet was easier for me and I stuck with it. Then a few years ago I started loom knitting and that’s fun. Loom knitting doesn’t require the same amount of physical hand movement coordination. I’ve enjoyed using it to create many things.

There’s a project that I’ve been wanting to do for awhile; making 2 dishcloths, one by loom knitting and one by needle knitting and see how they compare. It took up until a couple weeks ago for me to get up the courage to try my hand at knitting with needles again. My Bff encouraged me and was convinced that I could do it.

I struggled to remember how to knit with needles. Then I went on that famous video site and refreshed my mind on the basics. I worked on my first knitting needle project attempt over and over, at least a dozen times. I’d knit and purl and miss a stitch or the yarn would slide off the rods or I’d drop the rods and then I’d unravel it, recast on and take off again. I did this for a couple of days. Then I finally got a bit better.
During my trial and error, I worked up a pattern for a dishcloth and finally needle knitted the dishcloth without missing a stitch.

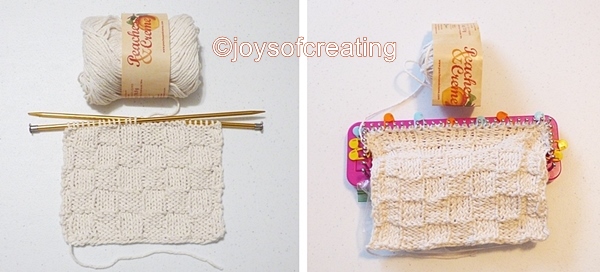
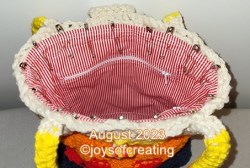
I used size 7 knitting needles, they were the smallest size I have. I made up a pattern for a dishcloth for my Boye Sock Loom that is the same finished size as the needle-knitted one.
The stitch pattern I used for both needles and loom knit is what I call a ‘basket-weave’, I’ve heard it called a tile stitch, a cobblestone stitch  and I even heard it called a waffle stitch. I think, regardless of what you call it, as long as you’re enjoying creating with it, then that’s what matters most. 🙂

The dishcloths are not blocked.

I used a knit & purl pattern for the knitting needle basket weave. For the loom knit basket weave I used Ewrap & Purl pattern. (Truth is, I was halfway through the loom knitted dishcloth before it occurred to me that ‘ewrap stitch’ isn’t the ‘knit stitch’. :/ I decided it didn’t make enough difference to matter, so I continued on.)

The dishcloths are not blocked.

The Needle Knitted dishcloth is 6×6 squares. The Loom Knitted dishcloth is 7×7 squares. I had to make the loom knitted one a square more to get the two dishcloths to be close to the same size.
I used a ‘slip-stitch’ for the edges of the loom knitted dishcloth. It finishes off a project smoother and neater.
I’m not skilled enough at needle knitting to know a stitch to make a smooth edge, so I just carried the k,p pattern alternating out the 2 stitches for the edge. It’s not very neat and tidy, but it works-for-me. 😉

The dishcloths are not blocked.

Both of the dishcloths are handy for washing dishes. I know some folks might think them small, but for me they’re the most comfortable size.

The dishcloths are not blocked.

My comparison of needle knit and loom knit dishcloths turned out well. I think that both the needle knit and loom knit fiber-art forms are wonderful outlets for artistic expression for making fun, useful, beautiful or silly creations.

I’m happy that I relearned how to knit with needles. I may attempt to make another project in the future.

Wishing you all fun with whatever craft or project you’re doing or planning.
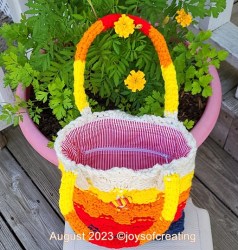


Random 5 For Friday

I’ve a new knitting loom project in the works. I hope to get it finished soon. Here’s a sneak peak.

I bought a sunflower mat and butterfly flowers from the fundraiser my niece’s sorority was having. I wish it was warm enough to get these darlings growing, but that’ll be a couple months from now.

The freezing snap we had this past weekend bit our pear tree blossoms and made them start turning brown. The pear trees are usually so pretty with their dainty white blooms, but this year, they’re sad looking.

It’s warmed up a smidge here, it’s a dreary, rainy 42°. We’ve had so much rain that even the daffodils look sad.

 Earlier this week we had internet trouble. We bought a new router and thought that would fix the issues. Well, it did for about 24 hours then the issues returned worse than before.
I picked up our home phone to call internet support and was met with a shrill squelch and loud static. I checked our other house phone lines and they were dead.
I thanked the good Lord above for my handy-dandy mobile phone and then called the phone company and reported the issues.
They sent out a service guy and he discovered that our phone trouble was caused by line issues down-the-road-a-ways. It took 3 service people a few hours to fix the landline.
Our phone works great and the internet is faster than ever… Yep, you guessed it, we didn’t need a new router. However, since our other router was 4 years old, we decided to keep the new one. We’ll hang on to the old one for back-up.

I hope you all have a weekend free of cold and internet issues.


.


PVC Pipe Knitting Loom Stands – with lengths for various looms

In 2013 when my sister introduced me to loom knitting, my main problem with the loom was the handling of an ongoing project. My wrists would ache and my work would bunch up underneath. It was so awkward for me. I thought I was going to have to quit before I even learned the skill.
Then I had an idea, a wonderfully helpful idea for an easy way to make reusable frames to fit any size knitting loom: pvc pipe, pvc joints and Ponytail Bobbles

The PVC Pipe is 3/4 inch.

I can make the legs any length I need. I use the stand like a lap tray.

When my knitting project starts getting long, I put a trash bag over the stand and secure it with tape to the frame.

I shared my pvc frame idea with my sister. She loved it and has been using it too ever since.
And there you have it, one more thing that helped make my loom knitting much more enjoyable.
I hope it helps some of you all too.

Happy crafting


It’s been brought to my attention, that some wonderful crafters have made loom stands going by my basic directions. I’m so happy that my design is helpful to hopefully make loom knitting more enjoyable.

However, I worked hard on making the loom stand designs and tutorial.
In exchange for using my designs, if you post a photo of your loom stand anywhere in a group, forum or online, and are asked about it’s construction or how to make it,  you’re welcome to post a link back to my blog.
https://joysofcreating.com/
or post a link directly to my blog post:
https://joysofcreating.com/2019/01/15/pvc-pipe-knitting-loom-stands/
Thanks so much! Happy Crafting!


edited in 2-10-2019:
I do not glue the stands together.
I don’t use adhesive on the pipes nor couplings.
The reason I don’t glue the pipes and couplings together is that I’m constantly using different size looms and can’t afford to dedicate one stand per each. Nor do I have the space to store them.
For my use, there’s enough suction, when the pipes are pushed securely in to the couplings, to hold them together.
I’ve not had a problem with the pipes/couplings coming apart when I use them.
The suction isn’t tight enough to hold them together forever.
From time-to-time, I check the joints and pipes to make sure they’re still snug, if they feel loose I push them back together.

If you want to dedicate a specific stand to a specific loom for all-time, then gluing it together may be something you might want to consider.


I use ‘Ponytail Bobbles’ to hold the looms on the stands.


Edited in: 9-23-2020
Sometimes I make the loom stand with shorted legs in front to make the loom stand slanted.
The slanted loom stand works well for me for one sided projects like scarves, dishcloths and flat pieces.
I use Chair Leg Caps on the bottom of the pipes because of the sharp or rough edges.


It’s been brought to my attention, that some wonderful crafters have made loom stands going by my basic directions. I’m so happy that my design is helpful to hopefully make loom knitting more enjoyable.

However, I worked hard on making the loom stand designs and tutorial.
In exchange for using my designs, if you post a photo of your loom stand anywhere in a group, forum or online, and are asked about it’s construction or how to make it,  you’re welcome to post a link back to my blog.
https://joysofcreating.com/
or post a link directly to my blog post:
https://joysofcreating.com/2019/01/15/pvc-pipe-knitting-loom-stands/
Thanks so much! Happy Crafting!


Pearl Blanket – 28″ KB Loom + peg extenders

I’ve decided to try to catch up on my projects before starting new ones.
I chose my blanket to finish up first. It’s been on the loom for quite a long time now.
I’m happy to finally have it finshed.
Shelibean tried the blanket out first. He seems to think it’s just right.
Here’s my blanket’s stats:
168 pegs – 28″ Knitting Board Loom + peg extenders
KB Knitting hook
8 skeins of 6oz 185 yds ‘Pearl’ Lion Brand HomeSpun Yarn
278 rows
46,704 stitches
Finished size 58″x58″

Here’s wishing all you all luck in finishing up your works-in-progress.

.

Loom Knit Snowmen

snwmn1My husband is in the Christmas spirit early this year. I guess it’s partly my fault since I’ve been working on some holiday crafts. Anyhow, We put up our tree and started decorating the weekend after Thanksgiving. As I was unpacking a box of Christmas decor I came across 3 snowmen I had made for Christmas 2015.

As I recall, I got the idea from CherryWillow in August of 2015. She made some adorable no-sew snowmen out of socks and beads. If you get a chance go check them out. She has a link to a video tutorial link.

I originally wanted to use my Grandson’s socks that he had outgrew when he was much younger. He never got a chance to wear them because he was living in another state. Unfortunately, I had put them in storage and didn’t want to go through boxes to find them, so I decided to make my snowmen out of something else.

I chose to loom knit my snowmen. I made a tube like a sock without a heel and it worked out well.

I made my first one small using a Boye sock loom, using off-white yarn to give it a rustic look. For it’s hat I used a 3.5″ Knifty Knitter loom. I stuffed it with polyfil and glued a round cardboard piece to the bottom for a base. I used buttons for it’s eyes. I crocheted the arms, scarf, carrot nose and sort of embroidered the smile & buttons. I made the pompom using a piece of folded cardboard and wound yarn oodles of times around it.lilsno
I decided to make 2 more snowmen but make them larger and out of white yarn; one made on a 5.5″ Knifty Knitter loom and one made on a 8.75″ Boye long loom. I wanted to see if they would turn out looking very much different using 2 different brands of looms. Happily they look quite similar and both turned well, I think.
I stuffed both snowmen with poly-fil. There’s no weight hardly and no real flat bottoms; I hot glued a round piece of card board to the bottoms so they wouldn’t be as apt to topple over.
I loom knitted their hats and crocheted their arms, scarves, buttons, carrot nose & eyes and embroidered the smile.
I made the blue pompom  using a piece of folded cardboard and wound yarn oodles of times around it.
I accidentally made the red hat an awkward length. It looked dreadful, so instead of a pompom on top, I tied a piece of yarn around the excess hat and made sort of a poof. snwmn2

Snowmen are so fun. I think they bring an extra bit of cheer to winter.

Wishing you all a cheerful rest of the week.

~*~

The Looms:11-29-2016-4-looms

Happy Crafting!


.

7-1-2016 Garden Update & Misc

P1030246The asparagus beans have done well so far this year growing/running up the decorative corn and the twine. However, next year we plan to plant the asparagus beans in a row of their own and make a trellis for them to run on. It’s awfully crowded in the corn rows now that both are maturing and fully leafed out.
P1030402Our decorative corn stalks are getting their-ears-on. We’re hoping the deer doesn’t decide to sample the ears before they mature and we can harvest some.P1030450We’ve been getting only a few regular green beans compliments of the deer. There’s wasn’t enough for a mess to cook or freeze, so we broke them up with the asparagus beans and froze them all together. We froze 4 1/2 quarts of asparagus/green beans. I think that’s pretty good. We’re already looking forward to cooking them. 😉

P1030375My 50+ bell pepper plants are beginning to put on fruit. I figure by the end of the month we’ll be covered in colorful bell peppers. I’ll be freezing them for soups, stir fries and other tasty dishes. If most of the plants put on fruit, I’ll probably be giving oodles of them away.

00I added a much needed set of new screwdrivers to my tool collection. My husband is enjoying helping me fill my toolbox with new tools. I like having my toolbox of tools here in the house ready to use anytime day or night. I don’t know why I didn’t think to get my own set of tools decades ago.

P1030394aI made a stacked tuna salad and it was so pretty I thought I’d share a photo of it.
A stacked tuna salad is layers as follows:
crushed corn chips,
tuna salad
chopped tomatoes
shredded mix cheese
with a cherry tomato on the top

P1030279The walnut tree is loaded heavy this year. My husband had to cut some of the heavily ladened limbs off. They were hanging low over the driveway and could do damage to our vehicles when they dropped walnuts or if the wind caused them to break.
I’ve always heard that a bountiful season for the nut trees means an extra cold winter. I truly hope not…

P1020348t09017Just in case the walnut tree is predicting some bad winter weather,
I got busy and made me a new hat on my green Boye knitting loom. Hey, it never hurts to be prepared.

Happy July 1st to you all!
It’s hard to believe half of 2016 has passed already.
Have a safe and fun filled weekend!
I wish you all a wonderful July full of blogging & smiles.ec-sunny

Long Long Martha Stewart Loom Part 2

P1000773108 inches = 9 feet
2 Martha Stewart Looms
8 – 6 pegs, 8 – 12 pegs, 4 – 36 pegs
288 pegs

Question about Martha Stewart Looms part 2:
“I was thinking of making one very long single loom with 2 packages of MS looms (not using corners or round pieces)…..do you think this will work?”

I put the 2 Martha Stewart Loom sets together in the long-long form. In the long-long form it’s not very sturdy and needs support otherwise it won’t handle the weight of much yarn in making a blanket or a large piece.P1000762

As you can see in the below photo, The long-long form isn’t strong enough to hold it’s own shape. I think it might break if it wasn’t on a stationary support of some sort.P1000777

Happy  Loom Knitting!smileywreath

This is a follow up post to my previous post
‘Martha Stewart Long Knitting Loom Sizes’

Martha Stewart Long Knitting Loom Sizes & peg spacing widths

I had a request for the measurements of Martha Stewart Loom set when the pieces are made into long looms.

I discovered that 3 different size long looms can be made.
Here’s the peg count and loom lengths:
—————————————————-
Long Loom 1:
200 pegs
2 – 28 pegs half circles
4 – 6 pegs
4 – 12 pegs
2 – 36 pegs
76 inches around0-200
—————————————————-
Long Loom 2:
168 pegs
4 – 6 pegs corner pieces
4 – 6 pegs
4 – 12 pegs
2 – 36 pegs
64 inches around0-6
—————————————————-
Long Loom 3:
164 pegs
2 – 10 pegs end pieces
4 – 6 pegs
4 – 12 pegs
2 – 36 pegs
63 inches around0-10

Happy  Loom Knitting!smileywreath

—————————————————-
edited in: 3-30-2019
I’ve had a request for pegs spacing sizes,
so I made a photo graphic it and added it to this post.


Red Heart Laptop Knit and Loom

IMAG0224_1When I first saw a photo of a ‘Red Heart Laptop Knit and Loom’ posted on a loom forum, I knew I had to have one. I had high hopes for this loom.  It’s rated for children ages 6+.  I figured since it’s rated for young children that the quality would be better than average.

I ordered The ‘Red Heart Laptop Knit and Loom’ online because it wasn’t available in my area yet. Coincidentally, a week after I ordered it, our local WalMart got them in. The shelf price was $24.97. I got mine for $19.97 and I didn’t have to pay for shipping since I had some other stuff to order that totaled their minimum for free shipping. I was surprised when I received my order a week before it’s predicted arrival date. ~happy dance~

IMG_6106What’s in the box:
Instruction Booklet
3 soft skeins of yarn
Collapsible storage bag
Loom set – outer case, loom circles and rectangle loom
52 pegs
Knitting Hook
Large plastic needle

*I like that The ‘Red Heart Laptop Knit and Loom’ is bigger than I thought it’d be, it’s about 15″x12″.
*The instruction booklet is adequate for learning the basics. In my opinion the Comprehension level of the booklet is more for older than 6.
*The yarn is soft and lovely. (I haven’t used it yet)
*The rings of pegs rotate and makes handling the project easier.
IMG_6178-0*The collapsible storage bag falls off the 4 rectangle-side-pegs too easily, but even so, it’s a good idea to use it to help keep the project cleaner and neater. Or use it like a basket to hold extra yarn and things.
*The side compartments of the loom case doesn’t always open smoothly.

IMG_6150-2a.
*My number one issue with the ‘Red Heart Laptop Knit and Loom’ is the pegs fall out of the holes on their own. I declare it’s worse than using a Martha Stewart loom. Even if you’re skilled in loom knitting and are careful, the pegs continually fall out. It’s frustrating and disappointing.
The pegs falling out  slows down progress because of having to take time to stop and replace the peg. Also, if you’re not careful it could cause drop stitches.
This is a very sad flaw in an otherwise potential fun creative experience for a child.
I don’t know what the inventors/manufacturers were thinking to allow such an important part of the set to be so low quality.

IMG_6153*The pegs falling out can be managed to an extent by using masking tape or painters tape. I’ve read some folks use a piece of yarn to help secure the pegs.

.

.

.

IMG_6136-2I made a hat using the inner 36 pegs of the green ring and double strands of Red Heart 4ply yarn.
It fits my head snugly. If I make another one, I’ll probably use the next size up.
I free-handed it and my basic pattern is:
Drawstring Cast On
45 rows of e-wrap
6 alternating rows of e-wrap and purl stitch
Chain 1 Bind Off

I hope this review helps if you’re thinking about purchasing a loom like this.

Happy Looming!

smileywreath

sp-line-orange