 Surprize! I finished my wallet that I posted about 7-14-2016. It only took me a month to get back to working on it, that’s not too bad a length of time for me.
The wallet turned out okay. It’s not perfect, but it’ll be just fine for me.
I messed up by using the foam fusable lining on the main part and it made the oraganizer a bit too bulky.
Two things I didn’t care for about the pattern was:
1) Having to use the method of putting on binding where you have to hand sew the second side.
2) I didn’t like that the bottom part of the dividers wasn’t attached to the wallet base. They free float.
I remedied the free floating problem by running a line of hot glue in the bottom of each divider bottom and glued it to the wallet base. It was an easy fix.
I’m happy I bought and made the pattern. Organizer wallets come in handy.
Happy Creating!
McCall’s Fashion Accessories Pattern
M6768 Design G without the strap

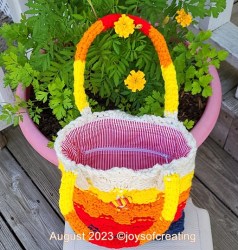
 Here’s my crochet project in progress. It’s going to be a bit bigger than my other 2 totes. I’m using 2 strands of yarn. I got bored with the 2 strands of gray color yarn. I changed the second strand to burgundy instead of continue using the second strand of gray.
 It has a zipper-pocket on each side inside.
 I’m ever so much happier with my old Bright Tote Bag now.


 I crocheted a tote bag, although I suppose it could be considered a handbag.
 My plans for this bag changed, as I went along. For the straps, I originally was going to use loom knitted icords.
 I decided to set zippers in the pockets. It was risky for me, since I’m not very skilled at zipper setting. However, I figured out a way to set the zipper that turned out pretty decent.
 I’m surprised the lining turned out as well as it did.
 All along, I played with the idea of either a simple flap closure or a zipper on the top. Well, I figured I’m this far into it, might as well go for it. It took me a few days to figure out how to set the zipper in the top that required only my limited skilled.
 Tah-Dah! The zipper looks okay and works great.


